
Setup nomad cluster using terraform on AWS


Introduction
In this blog post, We are going to set up a Nomad cluster on AWS using Terraform in a secure way. Also, deploy a Hello World web application.
Architecture
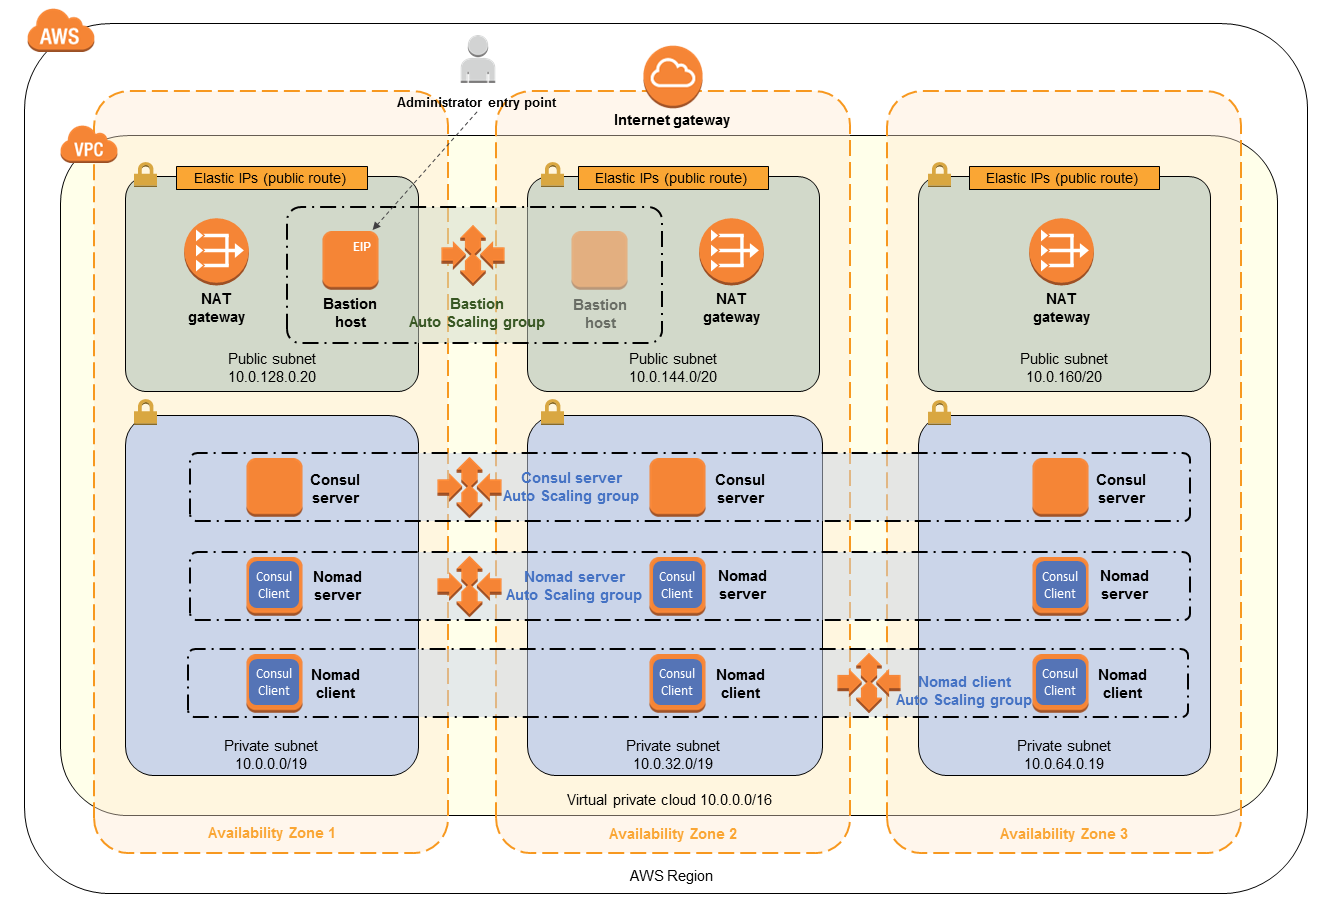
Below is the architecture of the nomad cluster we are going to create. As you can see, there are two client and server machines in the private subnet and one bastion machine in one of the public subnets.
The bastion machine is used to deploy the jobs to the nomad cluster. We connect to it using the ssh-tunneling. If you want to know more about SSH tunneling, I would recommend reading this article https://goteleport.com/blog/ssh-tunneling-explained/
Pre-requisites
AWS VPC: Follow this guide to create VPC with two public and private subnets https://docs.aws.amazon.com/vpc/latest/userguide/vpc-example-private-subnets-nat.html#create-vpc-private-subnets-nat
Terraform: Follow this guide to install Terraform cli https://developer.hashicorp.com/terraform/tutorials/aws-get-started/install-cli. Also, we use the terraform cloud in this example to manage the terraform state. You can read more about it here https://developer.hashicorp.com/terraform/cloud-docs/workspaces/state
Nomad cli: Follow this guide to install Nomad cli.https://developer.hashicorp.com/nomad/docs/install
Packer cli: Follow this guide to install Packer cli https://developer.hashicorp.com/packer/tutorials/docker-get-started/get-started-install-cli
Getting started
In this tutorial, We use the terraform module that I have written. https://github.com/omkar0001/terraform-nomad-cluster/tree/main
Create a working directory.
mkdir -p nomad-hello-world && terraform init
Clone the repo in the modules folder.
mkdir -p modules && pushd modules && \
git clone -v https://github.com/omkar0001/terraform-nomad-cluster/tree/main && popd
Build the AWS AMI image. Make sure the packer is installed.
packer init modules/build_ami && packer build modules/build_ami/nomad-consul.pkr.hcl
Create an SSH key for bastion, nomad server, and client. In this example, we are going to use the same key for all three machines.
ssh-keygen -f nomad_testCreate main.tf file with the following content. Replace public subnets, private subnets, VPC , and AMI with your values. The ami should be the ID of the ami created in the previous step.
# main.tf

data "local_file" "public_key" {
  filename = "./nomad_test.pub"
}

locals {
  public_subnets  = ["subnet-123", "subnet-456"]
  private_subnets = ["subnet-abc", "subnet-def"]
  vpc_id          = "vpc-123"
  ami             = "ami-123"
  port            = 81
}


module "nomad_cluster" {
  source              = "modules/terraform-nomad-cluster"
  name                = "test-nomad-cluster"
  private_subnet_ids  = local.private_subnets
  public_subnet_ids   = local.public_subnets
  vpc_id              = local.vpc_id

  nomad_client = {
      ami  = local.ami
      instance_type = "t2.micro"
      public_key = data.local_file.public_key.content
      count = 1
      nomad_ingresses = [{
        from_port = local.port
        to_port = local.port
        protocol = "tcp"
        cidr_blocks = [
          "0.0.0.0/0"]
      }]

  }

  nomad_server = {
     ami  = local.ami
     instance_type = "t2.micro"
     public_key = data.local_file.public_key.content
     count = 1
  }

  bastion = {
      ami  = local.ami
      instance_type = "t2.micro"
      public_key = data.local_file.public_key.content
  }
}
Finally, create a provider.tf file with the below changes. For this example, I have set up a Terraform cloud account. I also created an organization name test and a project name test within the cloud account.
# provider.tf

terraform {
  required_providers {
    aws = {
      source  = "hashicorp/aws"
      version = "5.29.0"
    }
  }
  cloud {
    organization = "test"
    workspaces {
      project = "test"
      tags = ["test"]
    }
  }
}

provider "aws" {
  region = "us-east-1"
}
Plan and apply the changes.
terraform plan
terraform apply
Connect to Bastion through ssh-tunneling using the below command.
Replace the {server_private_ ip} with one of the server's private IP addresses. Replace {bastion_ public_ ip} with the bastion public ip address.ssh -i nomad_test.pem -L 4646:{server_private_ip}:4646 ubuntu@{bastion_public_ip}
Suppose the nomad has been set up successfully. Then, the below commands should work.
// Returns the nomad servers
nomad server members

// This will return the clients
nomad status
Deploy sample Hello World application.
job "hello-world-web" {
 datacenters = ["dc1"]
 group "hello-world-web" {
   network {
     port "http" {
       static = "8081"
     }
   }
   task "server" {
     driver = "docker"
     config {
       image = "testcontainers/helloworld"
       ports = ["http"]
     }
   }
 }
}
You can check the job deployment by going to the UI at http://localhost:4646 and checking the Jobs section or running the command below.
nomad job status hello-world-web
Access the web application by connecting to Bastion using ssh-tunneling and exposing private client instance 8081 port.
Replace the {client_private_ ip} with one of the client's private IP addresses. Replace {bastion_ public_ ip} with the bastion public IP address.ssh -i nomad_ssh_key.pem -L 8081:{client_private_ip}:8081 ubuntu@{bastion_public_ip}
Finally, navigate to http://localhost:8081